Quick Tips for Better Photographs
Good morning! I’m really excited about today’s post because my friend (and now photography mentor) Jacquelynn kindly offered to share some beginning photography tips for DSLR users. Pin this to use as an easy reference later! Hope you enjoy and thank you again to Jacquelynn for sharing her tips with us all!
/////
These tips are based on using the pre-set modes on a Nikon digital SLR, but many cameras feature similar modes. Check your manual for details! These tips are also based on my personal experience teaching beginner DSLR users and based on my professional opinion and preferences for the best end result! For more advanced mentoring, feel free to contact me at jacquelynn@jacquelynnbuck.com or 229-699-0585
Beginning Photography Tips for DSLR Users
Know your Modes
Many digital SLRs come with pre-set camera modes that make your life easier. Know these modes and when to use them and you’re off to a great start!
Insider tip: I would suggest setting your camera on auto ISO if you’re going to use these modes!
Here’s a cheat sheet:
The little running man: intended for use with sports, or other fast moving objects or generally anything in motion (insider tip: try this with active toddlers!).
The mountain: this mode is ideal for landscape photography during the day. If you use this mode you may need a tripod if the lighting is low or dark. (Insider tip: try this mode with large groups of people).
The person’s head with the hat: use this mode for photographing people, individually or in small groups. It creates a softer looking background in relationship to the subject, but this also depends on the lens (insider tip: try this mode with a person and experiment by keeping the person in the same place but moving yourself farther and closer to the person and see what happens to the backdrop when you do!).
The child: this is ideal for fast moving kiddos. This mode will show the child and the backdrop as equally detailed, so if a soft background in relationship to a sharp subject is your desire, this mode won’t get you there (insider tip: try this mode with pets!).
The flower: this mode is meant for close up images, like flowers, insects, plants, but can also potentially require the use of a tripod if you’re using it in low light. (insider tip: Try this setting with sleeping children).
The person and the star: choose this mode for night photography to allow the background lighting to be a part of the image (the camera will deploy the flash and illuminate the subject at the right brightness while still showing the background lighting (insider tip: try this around holiday lights, placing your subject in a dark room lit only by the lights, set the person away from the lights and then switch to this mode. see what happens!)
PRACTICE: the best way to see how the modes showcase images differently is to take a single non-moving subject and place it in relationship to a backdrop of your choosing (think coffee mug on a table set far away from a wall, or outdoor table set away from the backdrop of your yard) and then take the same exact image from the same exact angle switching on the camera mode. This will show you how the subject appears in relationship to the backdrop and allow you to choose your best mode for the situation to get you the result that you like the best!
Control your lighting: inside
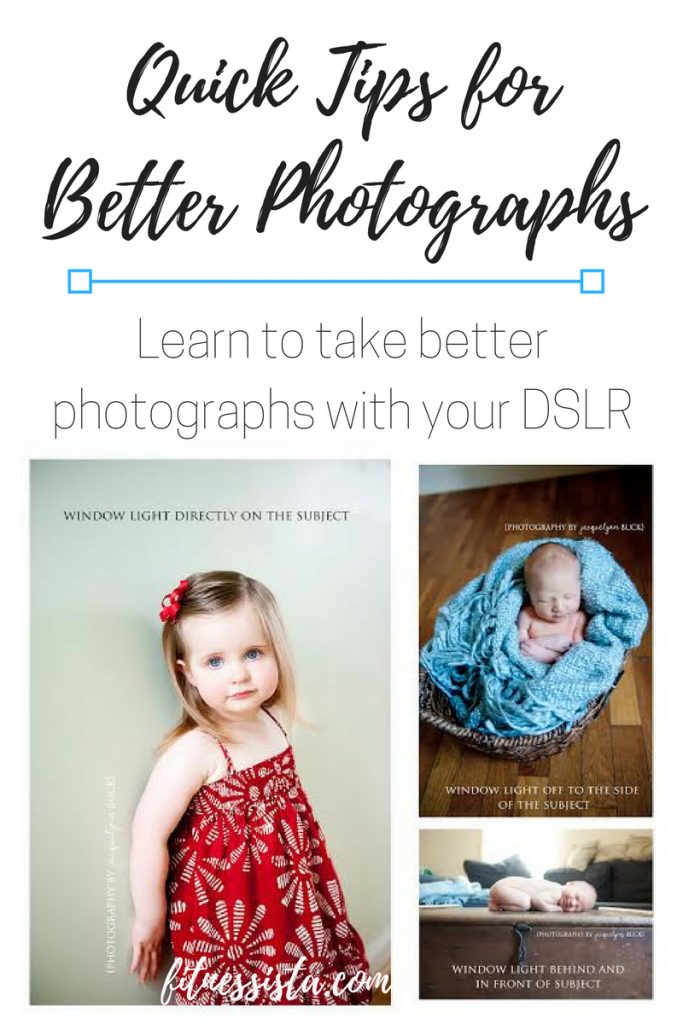
I know it’s tempting, especially with your kiddos, to turn the on-camera flash on and just snap away, but this doesn’t showcase the most natural looking images. You can’t always control where and when your child or subject is when you want to capture the moment, but when you can control it, I suggest doing so! Try choosing a room lit with window light and turning off all the other lights, overhead and lamp, in the room and turning off the auto flash.
Good images take intention – yes, you can sometimes just pick up the camera and put it in P mode and get a great shot, but if you want stellar images, be willing to take some time to control your environment especially when it comes to lighting.
Quick Look:
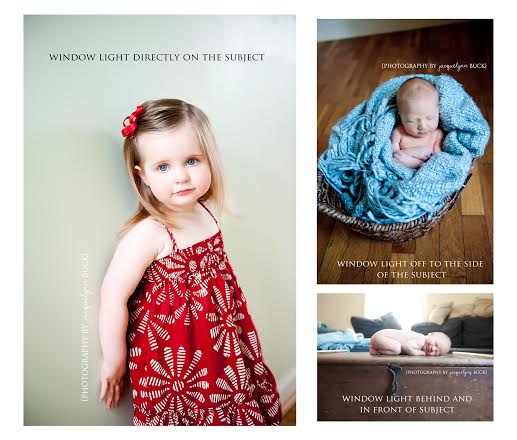
- Place subject in window light (where the window is either in front of the subject or, more pleasing, side lighting the subject).
- Turn off all the other lights in the room.
- Turn off the flash.
- Choose the person mode (for advanced users, choose manual mode (M) or aperture priority (A or AV) and set your f-stop at f2.8 or similar and your shutter speed accordingly).
- Experiment by moving around your subject. Take an image where the light falls flat on the subject. take another where the light is behind the subject. take a third where the light comes from the side. the best way to know what you like is to try every version!
3) Control your lighting: outside
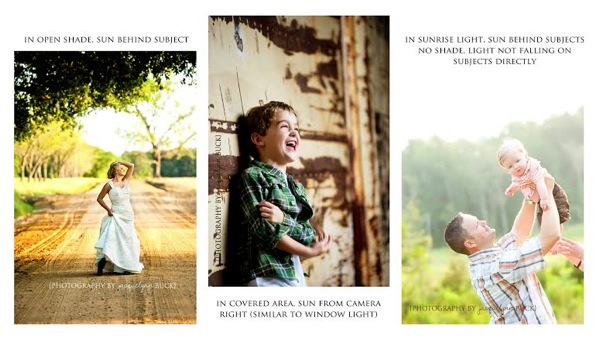
Choosing the right time of day to photograph is critical to good photography! Again, it’s about intention. Yes, you can pick up your camera or phone and snap a good image, but for a great image, be aware that finding the light is the first step. By taking a person outside in the right time of day and then putting them out of the direct light, you can achieve much better images than by putting them directly in the light. This takes some practice.
Quick Look:
- Take your subject outside into natural light right around sunrise and no more than an hour after or about 45 minutes before sunset, not earlier. (insider tip: light is dependent on your geographical location! In the desert there’s much less time to shoot when the light is right, on the east coast there’s more time, on the beach there’s even less time than in the desert. Know how your geography affects the amount of light and time of day you work best in!).
- Keep your subject from facing directly into the light, especially if being in the light causes them to squint.
- In shade: try placing your subject in a shady place, like in the shadow of a fence or underneath a tree (called open shade) where the light is still visible on the subject but not directly falling on the subject. Try turning the subject towards the direction of the sun (but be sure the sun isn’t shining directly on the subject) or try turning the subject away from the direction of the sun and incorporate the sun as the backlight (rimming the subject).
- No shade: turn the subject away from the direction of the sun and incorporate the sun as the backlight (rimming the subject).
- In shade your flash may want to pop up if your subject is too dark in relationship to the available light. Experiment with using the flash or without flash. Experiment with different modes!
4) Angles and Backgrounds
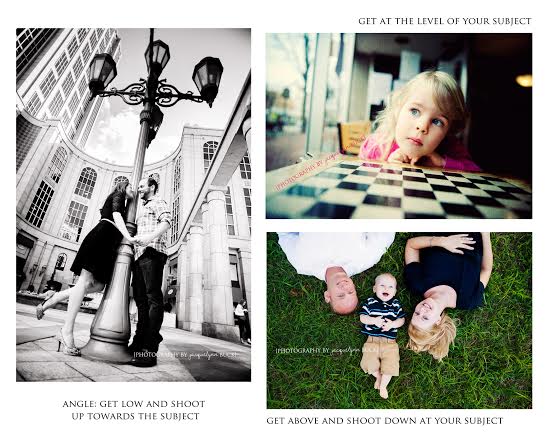
It seems easier to take an image without moving yourself or the subject. But the best images can happen if you think outside the box.
Quick Look:
- Try taking a photo from different angles other than straight on. Get up on a chair and look down at your subject. Get at the level of your subject and shoot from there. Be creative!
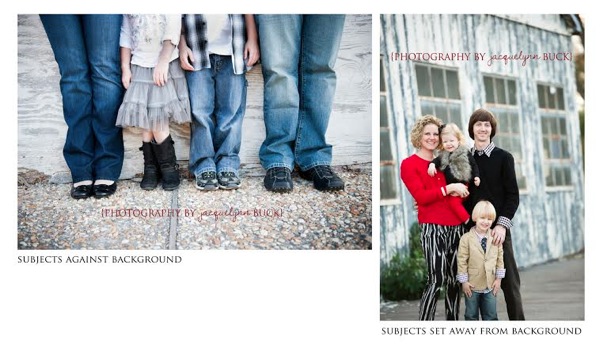
- Try situating the subject both against the backdrop and then farther from the backdrop for variety!
- Be aware of how your subject looks in relationship to the scene – like whether something (like a lamppost) is growing out of their heads!
5) A few more dos and don’ts
Take the time to do it right!: Many beginners rely on editing programs to “fix” bad images. Knowing what you like and how to get there with your camera saves you time and creates images that are stellar without extra work! Editing can be fun, and certainly allows for creative expression, but taking the time to do it right the first time means the editing can be not to fix it, but just to finalize it.
Tame down the toning: what’s trending now are colors and tones that create a look or feel to an image that is outside of what we would see with our naked eye. These tones are cool, and popular, and super fun to use, but when photographing images of people, especially of your kiddos and, possibly, if someone has hired you to photograph them, consider that tones and colorations are current now, but will fade over time. Classic color and light will always be in style. So if you’re tempted to tone, don’t let me stifle your creativity, but try keeping the original for comparison or for later when what’s trending has moved on.
Know when to hire a pro: When it’s time for family photographs, consider choosing a professional! Like the cobbler whose children have no shoes, don’t be the photographer who is never in the family photos. : )
6) It’s the photographer, not the camera. You’ve maybe heard it said that assuming a photographer has fabulous images because she has a great camera is like assuming a chef makes fabulous food because she has a fancy oven. I believe it’s about the person behind the equipment, and taking the time to learn how to use it, that makes the photographer, not the expensiveness or newness of that equipment. So don’t think you need the best and most expensive equipment to get started. Get to know what you already have. And the rest will follow!
I love my iPhone and use it as much on the go as I can – it’s quick, and easy, and lets me share moment to moment! So one last insider tip: one of my fav photo apps for the iPhone is PhotoCollage, which allows me to post multiple images at once and tell a more involved story!
For More Info contact Jacquelynn at 229-699-0585 or jacquelynn@jacquelynnbuck.com
{Photography by Jacquelynn Buck} in Tucson AZ {www.jacquelynnbuck.com}



Thank you so much for these tips Jacquelynn!! I really need to make using my camera and taking better photos a priority. I always notice when I visit a blog and they have stunning photos. It just makes the whole post that much better.
I agree with this!!! Sometimes I get lazy and just post pictures even when I know I could have taken better ones. Plus, these tips are so easy to follow!
All great tips- thank you!! I need to up my photo game!
Love these tips! I also love your photos, they are stunning. Thanks for sharing.
Thanks for the great and detailed tips! I needed this considering my photography skills are terrible. Do you apply the people camera setting as well when photographing food?
These are such helpful tips for a photography novice like me. I always keep the flash on and am realizing now that I can actually make the light better myself. Thank you for sharing your knowledge.
These are great tips! I’m definitely trying to up my game with my photography and this is so helpful!
These are great tips! I got my first DSLR (a Canon Rebel T3i) a few years ago as a gift and I’m still learning how to use it, since I have zero experience with “big kid” cameras as opposed to point and shoots. I did take a beginner’s class and I’m trying to practice more, but all the f-stop, aperture stuff still confuses me. My goal for this summer is to take more classes and actually dedicate the time to learn how to use it!
Love. These tips but I definitely want to invest in an SLR!
Awesome! I feel like all of my photos can benefit from your “lighting” insights.
Great post!
Love this! I have a DSLR and never use it because I just don’t feel like I know what I’m doing with it. I like that last tip especially. 😉
This makes me want to invest in a real camera and not rely on my iphone 100% of the time 😉
Great tips! Now I just need a nice camera to practice with 🙂
So many helpful tips and things to think about. I’ll definitely use them next time I’m taking photos.
Thanks so much for these extensive tips! My photography skills leave much to be desired – and I’m sure that one of the biggest changes I could make are to simply take the proper time needed. It’s nice to have these additional recommendations!
Great tips & info! Thanks!
This is awesome! I loved the lighting tips, and the part about a good picture being intentional. Thanks!
Thanks so much for the tips! Pinning this to reference later!
Lovely tips! Great pictures!
Lovely tips! Great pictures!
We’ve had a Sony Alpha1 or something for couple of years now. They do take great photos but they are also so bulky so really glad my husband carries it around, and not me 🙂